


COMPUTER PROGRAMMING FOR KIDS
STEP 2: GETTING YOUR FEET WET

As promised in Step 1, we will now take a look at the code that’s behind changing what’s on the screen in the “Guess Your Age” app.
Note: At this point (or at any point from here on), you can choose to either “follow along” or “play along.” By “play along” I mean writing the code I will show you in your own personal version of the app we will be discussing. If you feel ready to do that (and want to), what you need to do is download and install Microsoft’s Visual Studio Community Edition (it’s free). You can get it here: https://visualstudio.microsoft.com/free-developer-offers/ If this link is stale (if it no longer works), google “Microsoft Visual Studio free download” and look for the link in the search results that take you to Microsoft’s site.Although we will explore other languages and technologies later, such as HTML, CSS, JavaScript, and Java (you might find it odd, but Java and JavaScript have little or nothing in common, except for the name), the programming language we’ll be using in Visual Studio is C#. Why? Because C# is a good, general, full-featured programming language that is relatively easy to learn.
Note: By the way, “C#” is not pronounced “See Pound” or “See Hash” or “See Hashtag” but rather is pronounced “See Sharp” (as in the musical symbol). Of course, in musical terminology, Db (D Flat) is the same thing as C#, but C# sounds better than Db (to me, anyway). YMMV (“Your Mileage May Vary”).
So first I’ll show you some of the code “behind” the screens that were shown in the previous Step in our Journey. You may remember that the code you write is how you “talk” to the computer to tell it what to do. This will all look very strange to you at first. It will look like a foreign language. A very funky foreign language. And so it is, more or less. But don’t worry – you don’t have to learn it all at once. You will just learn what you need to know, a little at a time. So if this looks intimidating to you, don’t worry about it; It will all be explained in due time, as we go along.
This is the code that is run when either of two events happens: the app starts up, or the user clicks the “Next” button:
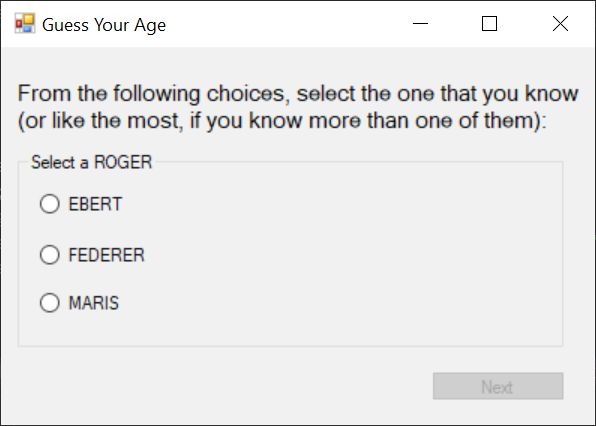
private void LoadNextBatch(){ sequence++; if (sequence == 1) { groupBox1.Text = "Select a ROGER"; radioButton1.Text = "EBERT"; radioButton2.Text = "FEDERER"; radioButton3.Text = "MARIS"; } else if (sequence == 2) { groupBox1.Text = "Select a BRUCE"; radioButton1.Text = "HERBELIN-EARLE"; radioButton2.Text = "LEE"; radioButton3.Text = "SPRINGSTEEN"; } else if (sequence == 3) { groupBox1.Text = "Select a SONG"; radioButton1.Text = "DEEP PURPLE"; radioButton2.Text = "SHAPE OF YOU"; radioButton3.Text = "SMOKE ON THE WATER"; } // sequence 4 through 10 elided for brevityNote: You will see the phrases “elided for brevity” or “the rest is left as an exercise for the reader” often in programming books and tutorials. The former simply means “left out to save space” and the latter means “we trust you to figure the rest out for yourself”; Actually, sometimes what the latter really means is, “I was too lazy to write it myself – you do it!” But again, don’t worry, I’m not going to leave you hanging and expect too much of you too soon. We will take this slow and steady, and not say, “the rest is left as an exercise for the reader” for quite a while yet – if ever!Another word before we continue: Do you see the equals sign (=) and the double equals signs (==) in the code above? The single equals sign (=) means “is now” or “becomes” (some programmers say “gets” or “is assigned”), and the double equals sign (==) means “is equal to” or “is the same as.”
So the first “if” statement above, and also shown below:
if (sequence == 1){ groupBox1.Text = "Select a ROGER"; radioButton1.Text = "EBERT"; radioButton2.Text = "FEDERER"; radioButton3.Text = "MARIS";}...means, in plain English:
If the value of the sequence variable is equal to 1, then do the following:
Make the Text of radiobutton1 “EBERT”
Make the Text of radiobutton2 “FEDERER”
Make the Text of radiobutton3 “MARIS”
Okay brace yourself for what comes next. ... Ready?
The left curly brace (“{“) can be read as “begin” and the right curly brace (“}”) can be read as “end.” If the value of the sequence variable is equal to 1, everything within the curly braces will run – no more, and no less.
Now we will go over the basic logic of the code, which is the “if … else if” portion of it. If...then...else logic, as it is called, is something you will use in almost all programming you do. In plain English, it is equivalent to saying, “if this happens, do this; otherwise if that happens, do that.” As we just saw above: if sequence is 1, then do all the stuff that follows within the curly braces.
As a reminder of what we’re going to be dealing with for awhile, this is what the app looks like when it starts up:
If the user selects the “Maris” value, the Form then looks like the screenshot below. After making a selection (clicking one of the three radio buttons), the user can select the “Next” button (which is circled) to bring up the next set of items.

As expected, when the user clicks the “Next” button, the screen changes again, with different text for the label and different items in the set of radio buttons:

The reason why this happens is because when the user clicks the “Next” button, the code triggered by that event (the button being clicked) runs. That code updates the value of the variable named sequence and the part of the “if … else” block of code that runs is the section where the value of sequence is 2. This is because the value of sequence had been 1, and the line of code “sequence++” increases it by 1, from 1 to 2:
sequence++;. . . else if (sequence == 2){ groupBox1.Text = "Select a BRUCE"; radioButton1.Text = "HERBELIN-EARLE"; radioButton2.Text = "LEE"; radioButton3.Text = "SPRINGSTEEN";}Hey! What about Bruce Hornsby?
In plain English, the code above is saying: “Increase the value of sequence by 1; if it is 1, make it 2; if it is 2, make it 3, etc. Now that the value of sequence is 2, the “else if (sequence == 2)” block of code will run. And so the GroupBox’s Text now reads “Select a BRUCE” and the RadioButton text values are, respectively, “HERBELIN-EARLE”, “LEE”, and “SPRINGSTEEN.”
Note: When you see “ellipsis dots” (. . .), as you do between “sequence++” and “else if” in the code snippet above, this means something has been left out, or there is something more that is not being shown. In the case of code snippets, it means some of the code is not being shown. The unseen code is not secret; it’s not being shown for now because it is not what is being focused on at present (it has been “elided” from our example).Each time the “Next” button is clicked, the value of the “sequence” variable is increased by 1. So the first time you click the button, the value of sequence is changed from 1 to 2, and the code above runs; each subsequent click of the “Next” button runs the next section of code (next time, the code where sequence is 3 runs, the time after that the code where sequence is 4 runs, etc.).
In the next Step on our journey, we will show you just exactly what code to write. You can either “follow along” by reading, or “play along” by actually copying that code right into Visual Studio (or typing it in yourself, if you prefer to do that).
The audio recording of this step is here: