


COMPUTER PROGRAMMING FOR KIDS
STEP 9: REFACTORING THE FORM (RETROFITTING FOR REPURPOSING)

As a programmer, you want your users to feel like a Pomeranian basking in the sunlight (that is to say, all warm and fuzzy):

Public domain Painting of Pomeranians by Thomas Gainsborough (1727-1788)
So to help the users feel that way, we will let them see “where they are” as they go through the questions.
To do that, we can use the same ProgressBar that is already on the form. When the first question is displayed, and then after each selection is made and the “Next” button is clicked, we will assign the Value property of the ProgressBar 10 more points than it previously had.
That code will look first like this:
// If in "Question mode," advance the ProgressBar the appropriate amountif (progressBar1.Value < progressBar1.Maximum){ progressBar1.Value = progressBar1.Value + 10;}Here it is in context (so you know exactly where to put the new code). As is our custom, the new code is bolded:
private void LoadNextBatch(){ sequence++; button1.Enabled = false; radioButton1.Checked = false; radioButton2.Checked = false; radioButton3.Checked = false; // If in "Question mode," advance the ProgressBar the appropriate amount if (progressBar1.Value < progressBar1.Maximum) { progressBar1.Value = progressBar1.Value + 10; } if (sequence == 1) . . .In plain English, what the new code is saying is: If the ProgressBar is less than “full” (that is, it is colorized all the way out to the right edge because its Maximum value has been reached), run the following code. So in the opposite case (it is at maximum/fully colored-in), the code does not run. When the code does run, the plain English for it is, “Add 10 to the current Value property – if it’s 10, make it 20; if it’s 20, make it 30,” etc. It will keep increasing until the Maximum (of 100) is reached, at which point the code to increase it will no longer run.
The reason why the amount the value is increased by is 10 is because there are 10 questions, and 100 (the ProgressBar’s Maximum value) divided by 10 (the number of questions) is 10. But what if there were a different number of questions? Then the 10 would no longer be valid. If there were 20 questions, the value should be 5 instead of 10. If there were only 5 questions, the value should be 20 instead of 10. If there were 25 questions, the value should be 4 instead of 10. And so on.
That being the case, we will prepare for possible future use of more (or less) than 10 questions by creating another variable, and assigning it the appropriate value when the app starts up. For now it will be assigned 10 (effectively changing nothing, in actual practice at present), but later it may change/vary. Stay tuned.
So for now, we add the variable stepAmount (again an int). This is where it’s “declared” in context (the new code, is bolded) and assigned a value:
int sequence = 0;int ageScore = 0;int stepAmount = 10;const int WHIPPERSNAPPER = 0;const int NYNO = 1;const int GEEZER = 2;And so we now change the previous code to this (the change to the code is bolded):
if (progressBar1.Value < progressBar1.Maximum){ progressBar1.Value = progressBar1.Value + stepAmount;}We also need to change the Labels above the ProgressBar. We’ll update the first one to say, “Question N of 10” (first “Question 1 of 10,” then “Question 2 of 10,” etc.). The other two Labels we don’t need for now, so we will simply make them (temporarily) invisible.
Note: “N” (as in “N of 10” above) often stands for an integer variable – an “unknown” value.In fact, since “Question Mode” is the mode the app will be in when the app starts (showing progress, as opposed to showing the score), we will first make the change in the Designer itself. To do so, follow these steps:
1) Select the “Form1.cs [Designer]” tab in Visual Studio.
2) Click on the first Label above the left edge of the ProgressBar (right now, it has “Whippersnapper” as its text).
3) Change the Text value to “Question 1 of 10” (when you select the Label, its Text property should be highlighted in the Properties pane on the lower right corner in Visual Studio).
4) Select the next Label to the right (the one which now says “NYNO”).
5) Scroll down to the bottom of the “Behavior” section on the Properties pane, to the Visible property, and change it from “True” to “False.”
6) Do the same thing with the third (“Geezer”) Label (that is, change its Visible property to “False”).
Note: Even though you changed the second two Labels from Visible to Invisible (Visible = “False”), it will look no different on the form at “Design Time” (when you’re working on it). It’s only at “Run Time” (when you run the app, by selecting F5 or the Debug > Start Debugging menu item) that it will not be visible. If you want to prove this to yourself, go ahead and run it now.Running the app now, the app will look like this as it starts up:

So those two Labels are invisible now (at “Run Time,”when running the app). But what about once we’ve reached the end? The Label will say “Question 10 of 10.” We want to switch from showing that (“Question 10 of 10”) in that first Label, to showing the user their Score. When exactly do we change the text of the Label, though -- When the user makes a selection for the 10th question? That might seem logical at first, but what if the user changes their mind about their selection and selects a different one (thus changing their score)? That is, they select one answer, but then change their mind and select another one? That might happen. So we have to wait until we know that they they have made their final selection. How do we know that? One way (remember, programming is partly an art form, and depends on your own personality and preference as to how you will make your apps work) is to add another Button which the user must click in order to see the score.
Let’s try that. We’ll put a button on the opposite (left) side of the “Next” button, and make it disabled to begin with (that is, it will be visible, but not be available for clicking). Follow these steps to do that:
1) Drag a Button control from the Toolbox to the form, and place it where indicated.
2) Make the Button a little larger than its default size if you want to. Definitely make it wider, either by dragging on its sizing handle at the bottom right, or by increasing its Width property in Visual Studio’s Properties pane.
3) Change the Text property to “Show Score”
4) Change its Name property to btnShowScore
5) Change its Enabled property (within the Behavior category on the Properties pane) to “False”
Note: Although we haven’t been consistently doing it yet, it’s never a bad idea -- and usually a good idea -- to give your Controls (especially things you write code for, such as Buttons) a name. It makes your code easier to read. When you’re looking at your code, and you see btnShowScore, it’s much clearer to you what that button does than if it retained the default name button2 or some such.Your form should now look like this (at Design Time):
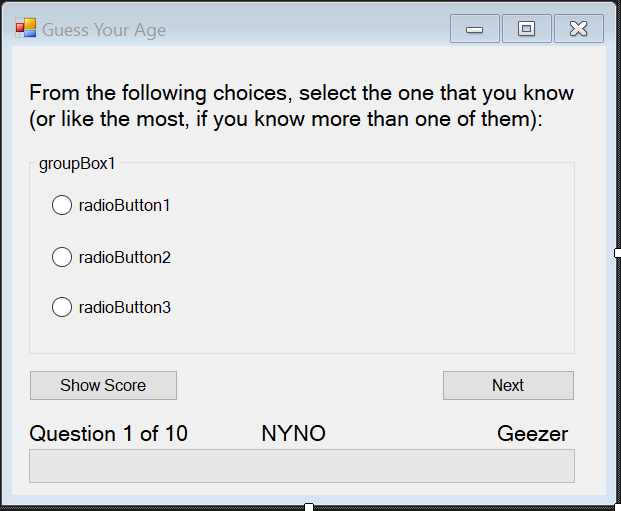
This is starting to get confusing, right? What a jumbled-up mess. What a tangled web we have woven -- When you look at it at Design Time, that is. That’s because we see a mixture of what will show when we are in “Progress Mode” (the “Question 1 of 10” Label) and what we will see when we are in score-showing mode (the “NYNO” and “Geezer” Labels, and the “Show Score” button).
So let’s get straight in our minds just what is going to happen:
First, the “Question 1 of 10” Label will show, but not the “NYNO” and “Geezer” Labels, and the “Show Score” button will be disabled (visible, but not clickable).
After all 10 questions have been answered, the “Show Score” button will become enabled. When the “Show Score” button is clicked by the user, the “Question 10 of 10” Label (as it will then read) will “go away”; actually, its Text property will simply change from what it was (“Question 10 of 10”) to “Whippersnapper”; also, the “NYNO” and “Geezer” Labels will become visible. The “Show Score” button will then be disabled, as it makes no sense to select it while the score is already showing.
In the next Step, we will add the code that makes all this happen.
Earth-shakingly Important Note: If you have a basic programming question (suitable to an audience of “Kids”), send it to idiolectable@gmail.com, specifying whether you would like your name and location used if it is printed in a future “Step” of this newsletter. A nickname is acceptable (the first “Letter to the Editor” of mine that was printed appeared in Rolling Stone magazine, back in the early 1970s, and I signed it “Sylvester” for some reason which I no longer remember). Also, it’s always interesting to see where people are from, so please provide your City or Town and the State it’s in, too (or Province, or whatever the region where you live is called).You can access the audio version of this Step (9) here: