


COMPUTER PROGRAMMING FOR KIDS
STEP 3: ADDING THE CONTROLS TO THE FORM

If you are “playing along,” I’m assuming that you have already downloaded and installed Visual Studio from Microsoft. If you haven’t yet, but now want to “play along,” go back to Step 2 (“Getting Your Feet Wet”) for the instructions on how to do that.
Open Visual Studio now (or continue to just “follow along,” if you prefer that), and start a new project by selecting File > New > Project…
In this case, the ellipsis dots (three periods, separated by spaces) after the word “Project” indicate that another option will display after you select it. And it does:
From the many options you are given, select the C# Windows Forms App as the Project Type:

Name the project “GuessingAges”; actually, you can name it just about whatever you want, but you will always want to give your projects a name that describes what the project does.
When the project is created, you will see two tabs. One says “Form1.cs” and the other says “Form1.cs [Design].” The visible part of the app is on the [Design] tab. The code is on the other one (Form1.cs). The two tabs are circled below:

Make sure the “Form1.cs [Design]” tab is to the fore (the tab will have a blue background); click on that tab if it is not to the fore/blue.
You will now see a blank Windows form. The first thing to do is to drag some items from the Toolbox onto the form. The Toolbox is circled on the left below:

When you click “Toolbox,” a selection of controls will pop out from the left, as you see above.
Drag and drop the following items from the Toolbox onto the form (all of which are rectangled in the screenshot above):
1 Label
1 GroupBox
3 RadioButtons
1 Button
Move the controls around the form so that it looks somewhat like my form (it doesn’t have to be exactly the same in appearance):

For the label you placed near the top of the form, give it the text you see above (or something similar – feel free to reword it if you want to). You can change the Label’s text by following these steps:
1) Click on the Label.
2) Locate the “Properties” pane at the lower right of your Visual Studio screen.
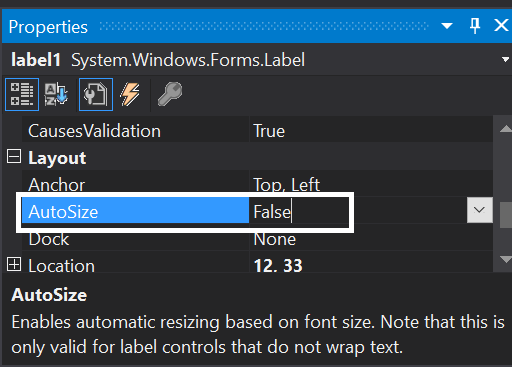
3) So that the text will cover more than one line, change the Label’s AutoSize property (in the Layout section) from True to False:
4) Scroll down to the “Text” property of the Label (highlighted below)
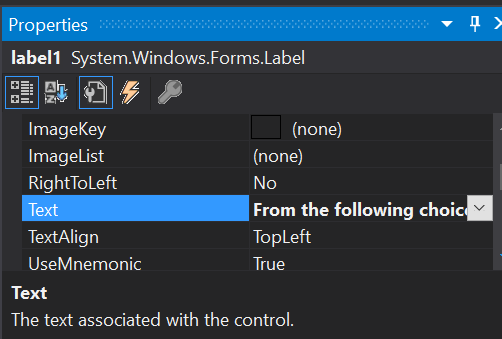
5) Click in the cell directly to the right of “Text” and type in the text you want the Label to have, such as “From the following choices, select the one that you know (or like the most, if you know more than one of them)”
In a similar way, change the “Text” value of the Button control to “Next” (click the Button, scroll to its “Text” property, and replace its default value with “Next”).
So what we now have is a form with, from top to bottom:
1 Label, that explains the purpose of the app
1 GroupBox to hold some RadioButtons
3 RadioButtons on the GroupBox control
1 Button control
In our next Step, we will add some code, on the Form1.cs tab. It’s only fair to warn you that sometimes when you write code, you feel a bit like this cat:

Image provided by J.J. at the English language Wikipedia / CC BY-SA (http://creativecommons.org/licenses/by-sa/3.0/)
Earth-shakingly Important Note: If you have a basic programming question (suitable to an audience of “Kids”), send it to idiolectable@gmail.com, specifying whether you would like your name and location used if it is printed in a future “Step” of this newsletter. A nickname is acceptable (the first “Letter to the Editor” of mine that was printed appeared in Rolling Stone magazine, back in the early 1970s, and I signed it “Sylvester” for some reason which I no longer remember). Also, it’s always interesting to see where people are from, so please provide your City or Town and the State it’s in, too (or Province, or whatever the region where you live is called).The audio version of Step 3 is here: