


REAL-WORLD COMPUTER PROGRAMMING FOR KIDS of ALL AGES
STEP 39: POPULATING the STATES TABLE with DATA, Part 1

Good morning, afternoon, or evening, everybody! For me it’s early morning, September 3rd, 2020, but I of course don’t know when you will be reading this. It won’t even be posted until the latter part of this month, so sometime after that (obviously).
Anyway ... So we have gathered the data we need for our states Table, but it at present resides in text files. Here’s my plan of action:
Insert the stateName and areaSqMi values into the Table, giving the columns that require values (which have been designated “NOT NULL”) “placeholder” values, such as 0.
Update the states Table, adding the actual value in the population2020 column from the text file that has that.
Update the states Table again, this time adding the actual value in the dateAdmitted column from the corresponding text file.
Update the states Table yet again, this time adding the BookURL value from the appropriate text file.
Before that, though, I have reconsidered the structure of the Table, and decided to make the bookImage column a “string” path to the location of the file, after all, as is de rigeuer and “the preferred method.” That will be a lot easier, as well as being what you would probably do in a “real-life” situation, so it’s a better approach.
Okay, then -- the first thing to do will be to restructure the states Table in that way. Let’s get to it!
RESTRUCTURE TABLE
This is why I love Database Workbench (DBWB): It’s easy as (eating) pie to alter the table. Normally, you have to jump through hoops to do so, but I asked myself, “Knowing how easy DBWB normally is to work with, could it be possible that all I need to do is modify the column in DBWB’s Columns tab?”
And sure enough, it works like a champ:
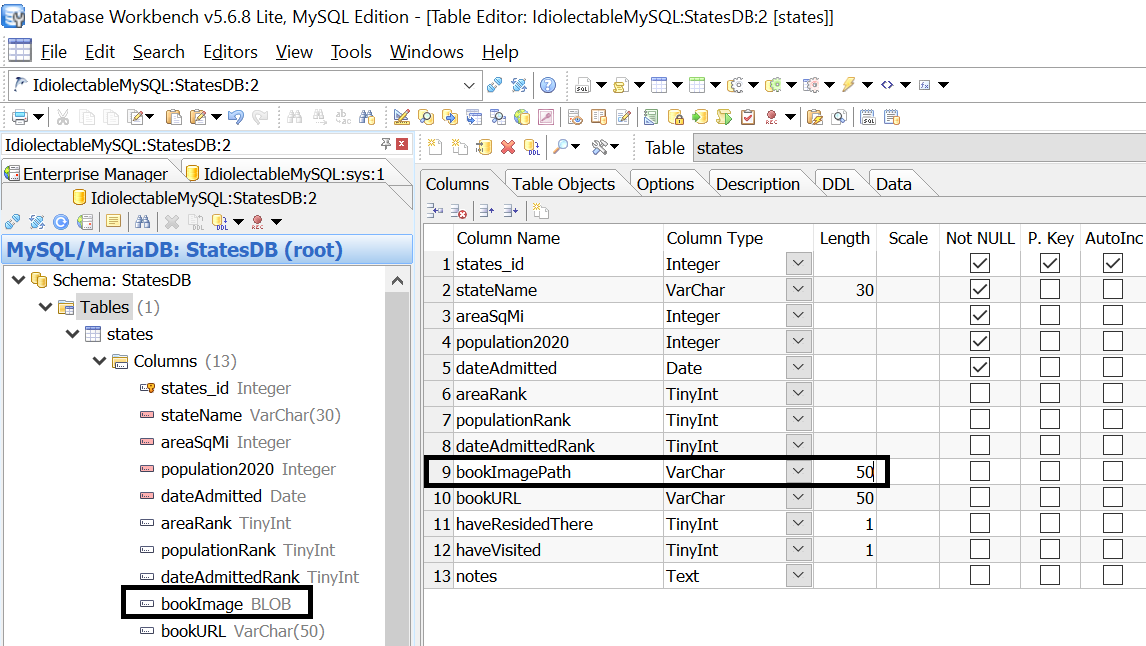
I changed the name of the column from “bookImage” to “bookImagePath” and changed its data type from BLOB to VarChar(50). Note that at this point it still has its original name and data type in the column list on the left:
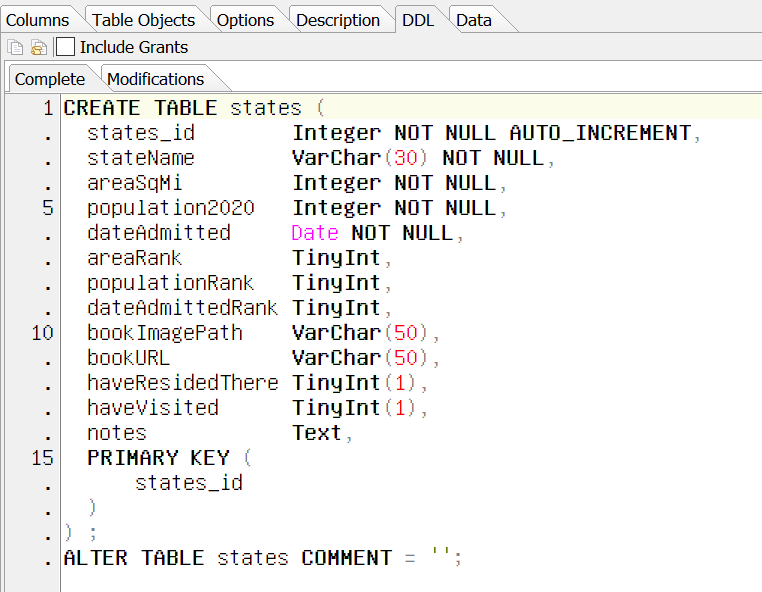
This is because the change hasn’t really been made yet, although the DDL has been updated already, as you can see here:
To make the change “stick” or “take,” click the “Create/Alter Table” Button/Icon:

Respond “Yes” to the “Alter Table States” confirmation dialog.
Note that now the altered column has moved to the bottom of the list of columns on the left:
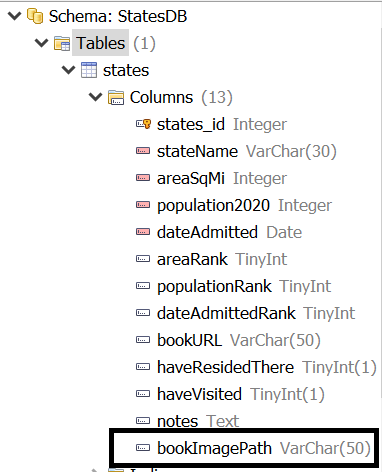
That doesn't matter, though. Its location in the list of columns doesn’t really change anything of import.
By the way, note too that the “NOT NULL” columns are visually indicated by having the little icon to the left of their names filled with color (pink). And the Primary Key column is not only filled (because it is also designated NOT NULL), but it also has a “Key” icon magnetized to the top of it.
So we’re in business. We will store a full path in that modified column (path plus file name) and read that value from it when we want to display the image on our Form (yes, we will create another Windows Forms app to display the data, after we create the one-time-use Utility to read the data into the database).
If we had the “full” version of DBWB, we could take advantage of its tools, such as “Import Data...” but this will be good practice for us to create a Utility to copy the data from our text files into the database.
CREATE THE UTILITY TO IMPORT DATA
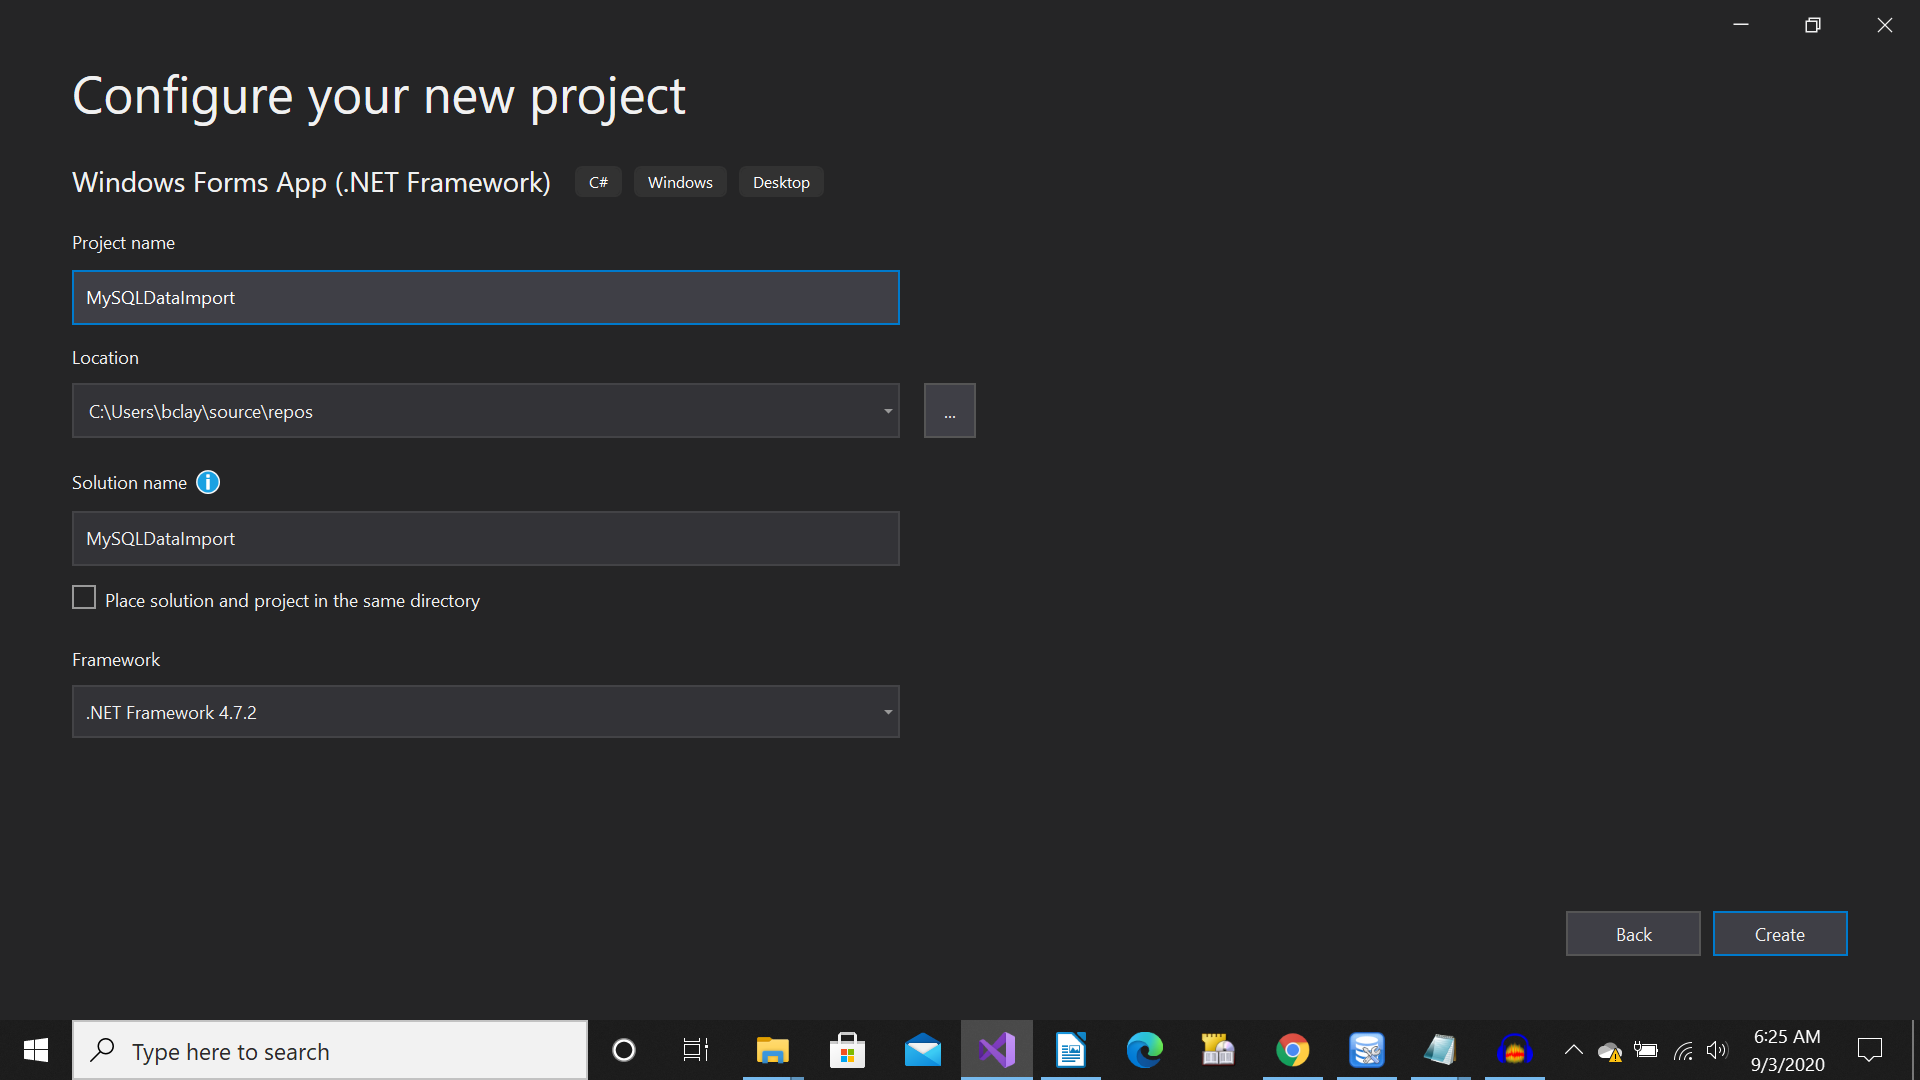
In Visual Studio, create a new C# Project, naming it “MySQLDataImport”
It should look something like this (but your “Location” value will differ):
INSERT SQUARE MILE VALUE
To prepare to insert the Square Mileage value into the areaSqMi column (and also the corresponding Rank value into the areaRank column), we need to make sure what our text file contains is ready for reading. That is to say, we want to make sure that it is “well-formatted.”
Again, that data appears in the file like so (after I removed the commas from the Square Mile values):
1 Alaska 5706412 Texas 2619143 California 1559734 Montana 1455565 New Mexico 1213656 Arizona 1136427 Nevada 1098068 Colorado 1037309 Wyoming 9710510 Oregon 96003. . .50 Rhode Island 1034
To make the data easier to deal with programmatically, we want to convert this to a CSV file. The quick-and-dirty way of doing this is to replace a number of spaces in the file (which exist between the Rank value and the State name, and also between the State name and the Square Mile value) with a comma.
By doing that, the data now looks like this:
1,Alaska,5706412,Texas,2619143,California,1559734,Montana,1455565,New Mexico,1213656,Arizona,1136427,Nevada,1098068,Colorado,1037309,Wyoming,9710510,Oregon,96003. . .50,Rhode Island,1034
Wallaby! Just what the Intern ordered! You can now do a “Save As” with a .CSV extension (rather than the default .TXT) – in fact, you may as well do that now.
So now we can add the code to read that file, loop through it, and populate those values into the states Table.
Add a Button to your Form, name it btnInsertSqMiEtc, and give it the Text “Insert Square Miles, Etc.” - or something like that.
This is a one-time-use Utility, so it doesn’t have to look fancy. Just plop the Button anywhere on the Form.
2-click the Button to open its Click Event Handler in the code window. Add the following code there; this is all the code from the Utility so far; this time I will bold, not the new parts (it’s all new), but the key parts which I will dissect (not literally, of course) later.
using MySql.Data.MySqlClient;using System;using System.IO;using System.Text;using System.Windows.Forms;namespace MySQLDataImport{ public partial class Form1 : Form { MySqlConnection conn; string connstr = "server=127.0.0.1;user id=root;password=gr8OoglyMoogly;persistsecurityinfo=True;database=statesdb"; public Form1() { InitializeComponent(); } private void btnInsertSqMiEtc_Click(object sender, EventArgs e) { string selectedFile = string.Empty; string[] fileStrArray; int rank = 0; int squareMiles = 0; string stateName = string.Empty; const int RANK_INDEX = 0; const int STATE_NAME_INDEX = 1; const int SQUARE_MILES_INDEX = 2; using (OpenFileDialog openFileDialog = new OpenFileDialog()) { openFileDialog.InitialDirectory = @"C:\ ComputerProgrammingForKids_Substack\"; openFileDialog.Filter = "CSV files | *.csv"; try { conn = new MySqlConnection(connstr); conn.Open(); if (openFileDialog.ShowDialog() == DialogResult.OK) { selectedFile = openFileDialog.FileName; fileStrArray = File.ReadAllLines(selectedFile, Encoding.UTF8); foreach (string line in fileStrArray) { string[] dataElements = line.Split(','); rank = Convert.ToInt32(dataElements[RANK_INDEX]); stateName = dataElements[STATE_NAME_INDEX]; squareMiles = Convert.ToInt32(dataElements[ SQUARE_MILES_INDEX]);MySqlCommand comm = conn.CreateCommand();comm.CommandText = "INSERT INTO states( stateName,areaSqMi,population2020,dateAdmitted,areaRank) VALUES( @stateName, @areaSqMi, @population2020,@dateAdmitted, @areaRank)";comm.Parameters.AddWithValue("@stateName", stateName); comm.Parameters.AddWithValue("@areaSqMi", squareMiles);comm.Parameters.AddWithValue("@population2020", 0);comm.Parameters.AddWithValue("@dateAdmitted", "1000-01-01"); comm.Parameters.AddWithValue("@areaRank", rank); comm.ExecuteNonQuery(); } } } finally { conn.Close(); } } } }}
See if you can figure out what’s going on in that code before we take it apart (so to speak). I will discuss it bold bit by bold bit, but first want to prove that it worked. Here’s the “Data” tab of the states Table in DBWB after running that code:

Note that the columns which can be null are null right now. We will populate them in future sections in the next Step.
From this point on, as we update the states Table with the missing values, I will only show what’s really new (Update statements, for example).
But now to go over the bolded code above, to explain what it’s doing, especially the database-centric stuff.
First off, though, take note that here we are embedding SQL (the “INSERT” statement) within C# code. They are different languages (C# and SQL), but merged together in this way, they don’t fight like your stereotypical cats and dogs, but get along just fine, as this pair does:

Photo by Krista Mangulsone, from Unsplash.com
So, then, on to the bolded parts:
using MySql.Data.MySqlClient;This “using clause” is needed in order to work with MySQL.
MySqlConnection conn;string connstr = "server=127.0.0.1;user id=root;password=gr8OoglyMoogly;persistsecurityinfo=True;database=statesdb";With any Database you use, you will need a Connection String which contains the location of the database and your credentials for accessing it. Where is it? It’s local, at 127.0.0.1. Who is attempting to use it? root, with a password of “Great Oogly Moogly!” (more or less). Which Database is being accessed? statesdb.
conn = new MySqlConnection(connstr);conn.Open();You also need a Connection Object, in this case a MySqlConnection object. Pass it the Connection String, and then Open the connection. You can think of opening a database connection as being somewhat the same as opening the floodgates or, if you will, turning the spigot (not spicket!) on the water hose to allow water to come out. Keep that thought in mind...
MySqlCommand comm = conn.CreateCommand();comm.CommandText = "INSERT INTO states( areaSqMi,population2020,dateAdmitted,areaRank) VALUES( @stateName, @areaSqMi, @population2020,@dateAdmitted, @areaRank)";comm.Parameters.AddWithValue("@stateName", stateName);SQL Statements such as INSERT, UPDATE, and DELETE are considered, in Database terminology, to be Commands. So there is a Command object, too, in this case a MySqlCommand object. Using the Connection object Instance (conn), CreateCommand is called and assigned to the Command object.
So what will the Command object do? That depends on what you assign its CommandText property. Here we are giving it an INSERT command: INSERT into [tableName] (list of columns) VALUES (list of values).
In this case, Database Parameters are being used. Did you notice the “@” sign preceding the values? We have used it before for string literals (such as in the Connection String, conn), but in this context it signifies that the values being passed are not literal values, but Parameters. In other words, they are assigned elsewhere. And, indeed, here are the assignments:
comm.Parameters.AddWithValue("@population2020", 0);comm.Parameters.AddWithValue("@dateAdmitted", "1000-01-01");The population2020 Parameter is assigned a value of 0. Why? Why not just leave it blank, or ignore it altogether? Because it’s one of the columns that has been designated “NOT NULL” – it must receive a value. Not much of a value (0), but still a value, so the Database doesn’t squawk when we give it this “placeholder” or “appeasement” value. Similar is true for the dateAdmitted column, which is assigned an obviously bogus (but valid) date value – the lowest/earliest one it can handle, over a millenium in the past.
comm.ExecuteNonQuery(); To execute the Command is not to kill it; it is to run it. The “NonQuery” part stipulates that this is not a Query (a SELECT statement), but rather a statement or Command that alters the Database (by adding, subtracting, or modifying at least one of its rows, or records).
finally{ conn.Close();}
Remember the analogy of turning on the water spigot when we call the Connection’s Open method? Once we’re through with the Connection, we need to close it. This only has to happen once, after we’re through with writing to the Database (just as it is only opened once per method), so I put the call to Close the connection in the “finally block” to assure that, in the end, the Connection definitely does get closed.
“Und damit basta!” as the Germans say!
In the next Step, we will add the Population value, Admission Date, and the Image Path and URL of the corresponding book (there is a book about each State which we will be featuring).
- Until then!
Earth-shakingly Important Notice: If you have a basic programming question (suitable to an audience of “Kids”), send it to idiolectable@gmail.com, specifying whether you would like your name and location used if it is printed in a future “Step” of this newsletter. If you are a subscriber to the newsletter, you can also leave a question at the bottom of this Step, in the “Comments” section.If you do not want to give your real name, a nickname is acceptable (the first “Letter to the Editor” of mine that was printed appeared in Rolling Stone magazine, back in the early 1970s, and I signed it “Sylvester” for some reason which I no longer remember). Finally, it’s always interesting to see where people are from, so please provide your City or Town and the State it’s in, too (or Province, or whatever the region where you live is called).To listen to this Step, the audio of it can be found here: