


REAL-WORLD COMPUTER PROGRAMMING FOR KIDS of ALL AGES
STEP 40: POPULATING the STATES TABLE with DATA, Part 2

Welcome back, all!
We have gotten a good start on populating our states Table. We will dive right back into it and finish that up.
UPDATE TABLE WITH THE POPULATION
We have the 2020 Population data in a text file that looks like this:
1 California 39937500 0.96% 39557000 37320900 7.01% 11.94%2562 Texas 29472300 2.68% 28701800 25242700 16.76%8.81% 1133 Florida 21993000 3.26% 21299300 18845800 16.70%6.58% 4104 New York 19440500 -0.52%19542200 19400100 0.21% 5.81% 4135 Pennsylvania12820900 0.11% 12807100 12711200 0.86% 3.83% 2876 Illinois 12659700 -0.64%12741100 12840800 -1.41%3.79% 2287 Ohio 11747700 0.50% 11689400 11539300 1.81% 3.51% 2888 Georgia 10736100 2.06% 10519500 9711810 10.55%3.21% 1879 N Carolina 10611900 2.20% 10383600 9574290 10.84%3.17% 21810 Michigan 10045000 0.49% 9995920 9877540 1.70% 3.00% 178. . .50 Wyoming 567025 -1.85%577737 564483 0.45% 0.17%6I had to change it a little, because it contained 52 entries, including Puerto Rico and Washington, D.C., neither of which are States. So I stripped those two out and updated the rankings from #34 on (so that there were only 50, not 52).
And besides, that – what a mess and tangled web somebody wove! All we want is the first and third columns, Rank and 2020 Population. Actually, we need the second one (State name), too, because we’ll need to reference it to see which rows we need to update in the states Table.
We could programmatically look for the first % sign in each line and delete everything from there to the right, but in this case it will actually be quicker to just “bite the bullet” and manually strip everytHing past the third column out.
After doing that, we only have those three columns we need. So let’s load this file into our Utility, loop through it, and update the corresponding records in the Database (based on a common State name).
So I stripped out the extraneous data and replaced the spaces between the “data points” (values) with commas, and saved the file as a CSV. Now to update the Table, follow these steps:
1) Drop another Button on the form, with the Text “Update with Population”
2) Name the Button btnUpdatePop
3) 2-click the Button to open up the Code window
4) Add the following code:
private void btnUpdatePop_Click(object sender, EventArgs e){ string selectedFile = string.Empty; string[] fileStrArray; int rank = 0; int population2020 = 0; string stateName = string.Empty; const int RANK_INDEX = 0; const int STATE_NAME_INDEX = 1; const int POPULATION2020_INDEX = 2; using (OpenFileDialog openFileDialog = new OpenFileDialog()) { openFileDialog.InitialDirectory = @"C:\ ComputerProgrammingForKids_Substack\"; openFileDialog.Filter = "CSV files | *.csv"; try { conn = new MySqlConnection(connstr); conn.Open(); if (openFileDialog.ShowDialog() == DialogResult.OK) { selectedFile = openFileDialog.FileName; fileStrArray = File.ReadAllLines(selectedFile, Encoding.UTF8); foreach (string line in fileStrArray) { string[] dataElements = line.Split(','); rank = Convert.ToInt32(dataElements[RANK_INDEX]); stateName = dataElements[STATE_NAME_INDEX]; population2020 = Convert.ToInt32(dataElements[POPULATION2020_INDEX]); MySqlCommand comm = conn.CreateCommand(); comm.CommandText = "UPDATE states SET population2020 = @population2020, populationRank = @populationRank WHERE stateName = @stateName"; comm.Parameters.AddWithValue( "@population2020", population2020); comm.Parameters.AddWithValue("@populationRank", rank); comm.Parameters.AddWithValue("@stateName", stateName); comm.ExecuteNonQuery(); } } } finally { conn.Close(); } }}
You can see that the code is quite similar to the previous, with the exception that we are using an UPDATE statement rather than an INSERT statement.
And it did work – here is the data in the Table now, with updated Population and Population Rank values:

UPDATE TABLE WITH THE ADMISSION DATE
Next up is adding the Admission Date (when the place became a State). The only somewhat “tricky” part of this is going to be converting the date from the human-friendly format in the file:
Delaware December 7, 1787Pennsylvania December 12, 1787New Jersey December 18, 1787Georgia January 2, 1788Connecticut January 9, 1788Massachusetts February 6, 1788Maryland April 28, 1788South Carolina May 23, 1788New Hampshire June 21, 1788Virginia June 25, 1788. . .Hawaii August 21, 1959...to what the Database is expecting (“1000-01-01” type of dates, also known as YYYY-MM-DD). In other words, Delaware will need to be converted to “1787-12-07” rather than remaining “December 7, 1787.”
Note, too, that there is no “Rank” value contained in the file, so we will have to add that. Fortunately, it should be quite easy, as the list is in Date order (Ascending, from earliest to latest/most recent) – thus it is in “Admission Rank Order” already.
Remember to remove the commas from the file so that the date values are in the format “December 7 1787” rather than “December 7, 1787”; in this way, the Dates will not confuse our CSV reading code. But then add commas back, but in the right spot – replace the spaces between the two columns with a comma. Then, save the file with the .CSV file extension.
So, I think you know the rest of the drill -- add another Button to the Form, and give it an appropriate name and Text value.
The main code for the addition of Admission Dates is:
private void btnUpd8WAdmissionD8_Click(object sender, EventArgs e){ string selectedFile = string.Empty; string[] fileStrArray; int rank = 0; string stateName = string.Empty; string admissionDate = string.Empty; const int STATE_NAME_INDEX = 0; const int ADMISSIONDATE_INDEX = 1; using (OpenFileDialog openFileDialog = new OpenFileDialog()) { openFileDialog.InitialDirectory = @"C:\ ComputerProgrammingForKids_Substack\"; openFileDialog.Filter = "CSV files | *.csv"; try { conn = new MySqlConnection(connstr); conn.Open(); if (openFileDialog.ShowDialog() == DialogResult.OK) { selectedFile = openFileDialog.FileName; fileStrArray = File.ReadAllLines(selectedFile, Encoding.UTF8); foreach (string line in fileStrArray) { string[] dataElements = line.Split(','); rank++; stateName = dataElements[STATE_NAME_INDEX]; admissionDate = ConvertHumanToYYYYMMDD(dataElements[ADMISSIONDATE_INDEX]); MySqlCommand comm = conn.CreateCommand(); comm.CommandText = "UPDATE states SET dateAdmitted = @dateAdmitted, dateAdmittedRank = @dateAdmittedRank WHERE stateName = @stateName"; comm.Parameters.AddWithValue("@dateAdmitted", admissionDate); comm.Parameters.AddWithValue("@dateAdmittedRank", rank); comm.Parameters.AddWithValue("@stateName", stateName); comm.ExecuteNonQuery(); } } } finally { conn.Close(); } }}
The main difference between this code and the previous UPDATE methods are that the Rank value is not taken from the Text (CSV) file, but calculated by the method we wrote above -- we simply started with “0” as the value of the rank variable, and incremented it each time through the loop. The only part, other than that, which was really different from the previous UPDATEs was that the Date value had to be converted from the format it has in the CSV file to the format MySQL expects it to be in.
You might find those “Utility methods” we used to do the conversion somewhat interesting. Rather than clutter up the main method (the Button’s Click Event Handler, shown above) with a bunch of stuff, I broke out the code to convert the human-friendly formatted Date values to what MySQL expects by first calling ConvertHumanToYYYYMMDD:
private string ConvertHumanToYYYYMMDD(string humanFriendlyD8){ // humanFriendlyD8 is in the format MONTH DAY YEAR (December 7 1787); // need to return in the format YYYY-MM-DD (1787-12-07) string year = string.Empty; string month = string.Empty; string day = string.Empty; string monthAsMM = string.Empty; string dayAsDD = string.Empty; const int MONTH_INDEX = 0; const int DAY_INDEX = 1; const int YEAR_INDEX = 2; string[] dateElements = humanFriendlyD8.Split(' '); month = dateElements[MONTH_INDEX]; day = dateElements[DAY_INDEX]; year = dateElements[YEAR_INDEX]; monthAsMM = GetMonthAsMM(month); dayAsDD = GetDayAsDD(day); return string.Format("{0}-{1}-{2}", year, monthAsMM, dayAsDD);}
...which calls, in turn, other “Helper methods” or “Utility methods” namely GetDayAsDD:
private string GetDayAsDD(string day){ if (day.Length == 1) { return string.Format("0{0}", day); } else return day;}
...and GetMonthAsMM:
private string GetMonthAsMM(string month){ if (month == "January") return "01"; if (month == "February") return "02"; if (month == "March") return "03"; if (month == "April") return "04"; if (month == "May") return "05"; if (month == "June") return "06"; if (month == "July") return "07"; if (month == "August") return "08"; if (month == "September") return "09"; if (month == "October") return "10"; if (month == "November") return "11"; return "12";}
It worked just fine, as you can see here:

There’s nothing really new in the first Utility method, ConvertHumanToYYYYMMDD, except that it breaks the line into elements at the space character (“ ”) rather than at the comma character (“,”) as previously seen. Thus, a line like “December 7 1878” is broken into a string array with these three elements:
December71787The GetDayAsDD Utility method simply assures that the value takes up two places by prepending a “0” if the existing value is only 1 character long (in other words, if it’s 1,2,3,4,5,6,7,8, or 9). So if a value of “10” or greater is passed to GetDayAsDD, it simply returns exactly what it was passed without changing it.
The GetMonthAsMM Utility method is pretty straightforward, too – it replaces a human-friendly month name such as “September” with its equivalent two-character designator -- such as “09” in that case.
UPDATE TABLE WITH THE BOOK’S IMAGE PATH AND URL
Last but not least, we need to add the path to the Book’s image to the states Table’s bookImagePath column, and the URL of its amazon page to the bookURL column.
Add another Button as previously, to Update the Table with the bookImagePath value.
2-click the Button you just added and insert this code in its Click Event Handler:
private void btnUpd8WBookImgPath_Click(object sender, EventArgs e){ string imgBasePath = @"C:\Cre8Space\Covers\"; string fileNameBase = "FrontCoverOnly"; string fileExtension = ".png"; string fullImagePath = string.Empty; string selectedFile = string.Empty; string[] fileStrArray; using (OpenFileDialog openFileDialog = new OpenFileDialog()) { openFileDialog.InitialDirectory = @"C:\ ComputerProgrammingForKids_Substack\"; openFileDialog.Filter = "TXT files | *.txt"; try { conn = new MySqlConnection(connstr); conn.Open(); if (openFileDialog.ShowDialog() == DialogResult.OK) { selectedFile = openFileDialog.FileName; fileStrArray = File.ReadAllLines(selectedFile, Encoding.UTF8); foreach (string stateName in fileStrArray) { MySqlCommand comm = conn.CreateCommand(); comm.CommandText = "UPDATE states SET bookImagePath = @bookImagePath WHERE stateName = @stateName"; comm.Parameters.AddWithValue("@stateName", stateName); fullImagePath = string.Format("{0}{1}{2}{3}", imgBasePath, fileNameBase, stateName, fileExtension); comm.Parameters.AddWithValue("@bookImagePath", fullImagePath); comm.ExecuteNonQuery(); } } } finally { conn.Close(); } }}
The thing different about this code from the previous is that this is not a CSV file, but a regular, generic Text (.TXT) file, as it only contains one “column” of data – the State Names. Thus, it is not broken up into a string array. The other interesting thing that happened was that at first it failed after adding a few rows. Why? Because I had thought 50 characters would be more than enough to hold all of the path values, but it was not. So I modified the states Table again in DBWB, this time by changing the data type of the bookImagePath column from VarChar(50) to VarChar(60). It worked like a charm bracelet after doing that. It didn’t hurt anything that a few records had already been updated, either, because it simply updated those same few again with the same values as before. It wasted one one-millionth of a second, perhaps, but I didn’t really notice it.
Here is the State of the Table now (no pun intended), with the Path to the Book Cover Image populated in all cases:

Now add another Button as previously, to Update the Table with the final value, bookURL value.
2-click the Button you just added and insert this code in its Click Event Handler:
private void btnUpd8WBookURL_Click(object sender, EventArgs e){ // Alabama is unique - it has "New" in it: https://www.amazon.com/New-All-too-True-Blue-History-Alabama-ebook/dp/B079ZRM5F7/ string alabamaURL = @"https://www.amazon.com/New-All-too-True-Blue-History-Alabama-ebook/dp/B079ZRM5F7/"; string basePart49 = @"https://www.amazon.com/All-too-True-Blue-History-"; string variablePortion = string.Empty; string stateName = string.Empty; string fullURL = string.Empty; string selectedFile = string.Empty; string[] fileStrArray; const int STATE_NAME_INDEX = 0; const int URL_INDEX = 1; try { using (OpenFileDialog openFileDialog = new OpenFileDialog()) { openFileDialog.InitialDirectory = @"C:\ ComputerProgrammingForKids_Substack\"; openFileDialog.Filter = "CSV files | *.csv"; try { conn = new MySqlConnection(connstr); conn.Open(); if (openFileDialog.ShowDialog() == DialogResult.OK) { selectedFile = openFileDialog.FileName; fileStrArray = File.ReadAllLines(selectedFile, Encoding.UTF8); foreach (string line in fileStrArray) { string[] dataElements = line.Split(','); stateName = dataElements[STATE_NAME_INDEX]; variablePortion = dataElements[URL_INDEX]; if (stateName == "Alabama") // Alabama is a special case; contains "New" { fullURL = alabamaURL; } else { fullURL = string.Format("{0}{1}", basePart49, variablePortion); } MySqlCommand comm = conn.CreateCommand(); comm.CommandText = "UPDATE states SET bookURL = @bookURL WHERE stateName = @stateName"; comm.Parameters.AddWithValue("@stateName", stateName); comm.Parameters.AddWithValue("@bookURL", fullURL); comm.ExecuteNonQuery(); } } } finally { conn.Close(); } } } catch (Exception ex) { MessageBox.Show(ex.Message); throw; }}
And Wallaby! The entire Table has now been populated! Notice how Alabama is a special case:
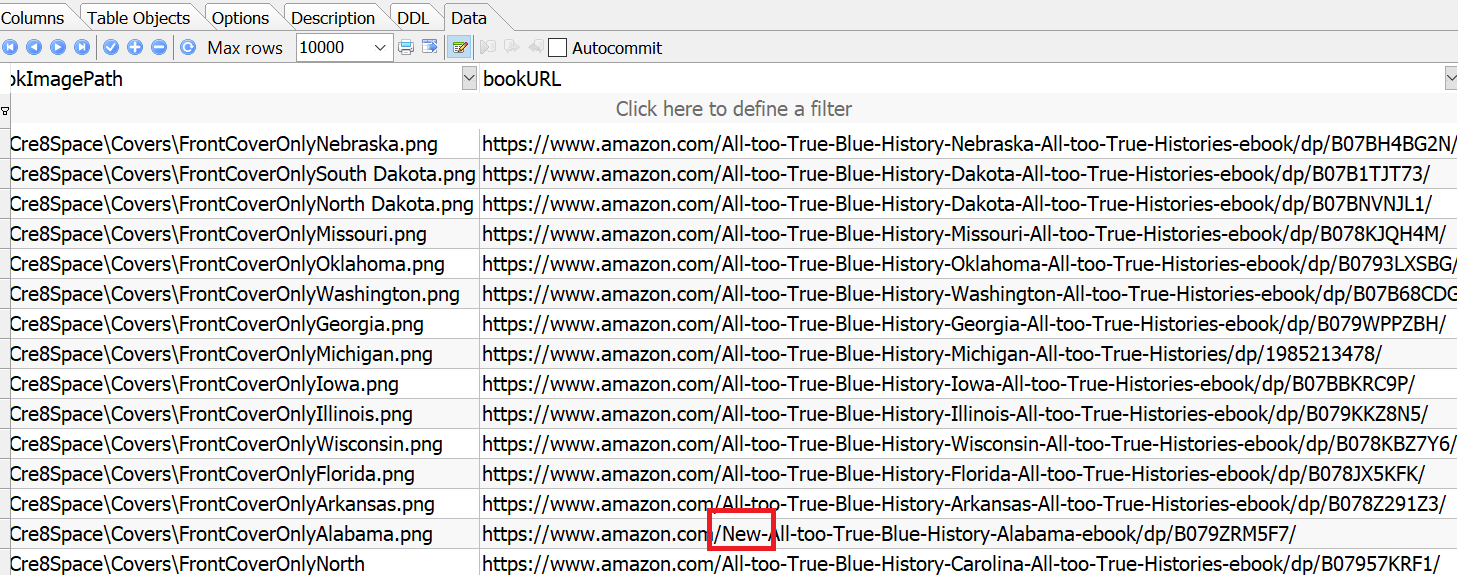
The unusual things about that part was that Alabama – as mentioned -- for some reason was a “special case” – it had the word “New” in its URL, and so has to be handled “with kid gloves” so to speak (as you can see in the code above). Also, I again misjudged how many characters I would need for this value – and this time I had to increase the size of the bookURL column from VarChar(50) to VarChar(120)!
Now that we have the Table fully populated (except for the three columns that the user can populate, which we’ll get to later), in the next Step we will try our hand at querying the states Table using the SELECT statement to see what sort of interesting things we can find in it.
Until then!
This entire leg of the journey has already been completed (although not released via the newsletter in whole yet). If you would like to get “the rest of the story” right away, the book is available as a paperback here: https://www.amazon.com/Real-World-Computer-Programming-Kids-Ages/dp/B08J21B69H/ and in Kindle format here: https://www.amazon.com/Real-World-Computer-Programming-Kids-Ages-ebook/dp/B08J2ZH66R/


Earth-shakingly Important Notice: If you have a basic programming question (suitable to an audience of “Kids”), send it to idiolectable@gmail.com, specifying whether you would like your name and location used if it is printed in a future “Step” of this newsletter. If you are a subscriber to the newsletter, you can also leave a question at the bottom of this Step, in the “Comments” section.If you do not want to give your real name, a nickname is acceptable (the first “Letter to the Editor” of mine that was printed appeared in Rolling Stone magazine, back in the early 1970s, and I signed it “Sylvester” for some reason which I no longer remember). Finally, it’s always interesting to see where people are from, so please provide your City or Town and the State it’s in, too (or Province, or whatever the region where you live is called).To listen to this Step, the audio of it can be found here: