


REAL-WORLD COMPUTER PROGRAMMING FOR KIDS of ALL AGES
STEP 38: CREATING the TABLE and GATHERING the DATA

Welcome back, kids of all ages!
Let’s jump right into (indirectly) creating the states Table.
If you closed it, start up DBWB, and select the Tables folder in the upper left. That should populate the main pane of DBWB, to the right.
Give the Table a name, specifically states, as rectangled below:

Enter the first column’s metadata (you may recall that “metadata” is data about data), so that it matches what you see below:
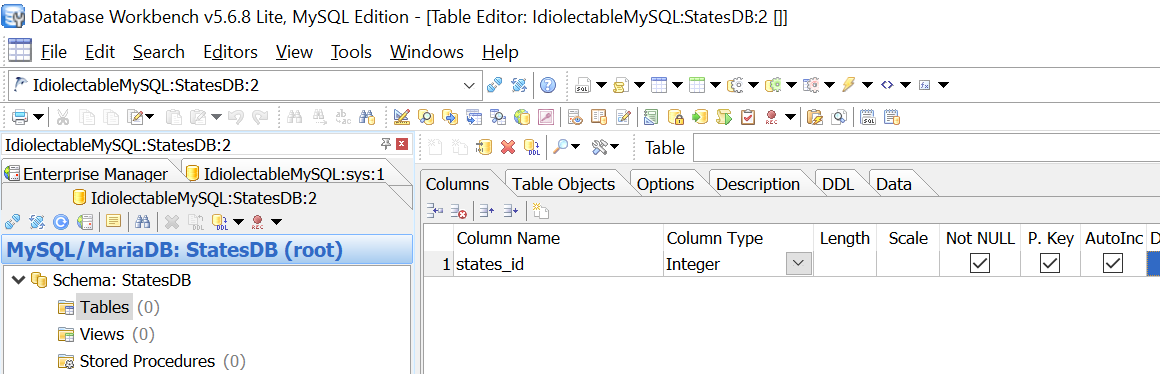
As you can see, the name of the column is states_id, its data type (“Column Type”) is Integer, and its NOT NULL, PK (Primary Key), and AUTOINC checkboxes are all checked. In other words, this column cannot be null/must have a value, it is the Table’s Primary Key (meaning this is the column that contains a unique value that no other row will have), and its value will automatically increment by itself, without us needing to do anything about it, or even really think about it any more.
So how has the CREATE TABLE statement, the DDL, changed? Let’s look at it:

We see that the DDL is prepared to create a one-column table with the column we just (again, indirectly) described. Its data type, name, and characteristics (NOT NULL, AUTO_INCREMENT, and PRIMARY KEY) have been recorded.
So let’s “trust” the DDL to be generated correctly, and finish adding the Columns and their characteristics on the Columns tab.
For each subsequent column, we need to click the “Add” icon, rectangled below:

Doing so in turn, enter columns and their values to match what you see below:

So how does the DDL look now? You might remember from the last Step that I was expecting the CREATE TABLE DDL statement to end up like this:
CREATE TABLE states( states_id INTEGER NOT NULL AUTO_INCREMENT, name VARCHAR(30) NOT NULL, areaSqMi INTEGER NOT NULL, population2020 INTEGER NOT NULL, dateAdmitted DATE NOT NULL, areaRank TINYINT, populationRank TINYINT, dateAdmittedRank TINYINT, bookImage BLOB, bookURL VARCHAR(50), haveResidedThere TINYINT(1), haveVisited TINYINT(1), notes TEXT, CONSTRAINT states_pk PRIMARY KEY (states_id));
In actuality, it is now this:

So there are some differences. But do you notice anything odd – unique – about one of the columns? What about the name column? It is italicized, because it is the only column name that is enclosed in quotes. But why is that?
Give up? It’s because “name” is a reserved keyword (used internally by the Database itself – by the MySQL language). So, it has to be treated specially so as to avoid it being a problem. It’s like when you have two friends named Winston. It can get confusing unless you add their surname (by either saying “Winston Churchill” or “Winston Smith”). Since there is MySQL’s “name” and the states Table’s “name,” the latter has to be enclosed in quotes to set it apart as different. “Which name do you mean: the plain name or the quoted name?”
Noting that, though, I decide that it is safer to use a more specific name than the generic “name”; and so, I go back to the columns tab and change it from “name” to “stateName.”
Now the DDL is:

Wallaby! The quotes are gone, and so naming the name column “name” no longer gives me the fantods. And it is pretty much the same thing as what I imagined it to be, the only real difference (besides “name” now being “stateName”) being that what I thought would be “CONSTRAINT states_pk PRIMARY KEY (states_id)” is really just the last part of that, specifically “PRIMARY KEY (states_id)”
Now the time has arrived to actually run the DDL, which will create the Table. Hopefully. Let’s see what happens when we click the “Create/Alter Table” button here:

I get this message:

That’s okay. Let MySQL use whatever it wants to that way. I don’t give a Tinker’s Reservoir. Click the “Continue” button.
Select “Yes” to the Confirm: Create New Table? dialog’s prompt.
And ... Wallaby! The Table has been created, as can be seen below:

But the Table is, of course, empty. It contains no data. If we queried it, even if our SQL was perfectly formed, we would receive no data back (naturally). So now we will populate the states Table with data – 50 rows of data, one for each U.S. State.
We could painstakingly gather all the information – the Square Miles of each State, the 2020 Population, the Dates the States became part of the United States, etc. But the chances are that somebody has already gathered this information somewhere. One of the phrases you should remember is, “Google is your friend.”
When it saves you time and effort and tedium, anyway, it’s true – Google is your friend! So let’s google for that data, so that we can save it to files and subsequently populate our states Table with it.
Googling “square mileage for each State” I get this [https://statesymbolsusa.org/symbol-official-item/national-us/uncategorized/states-size], which is just what the chiropractor ordered – it’s even in rank order! I copied it all and pasted into a .txt file. The first ten “records” are:
1 Alaska 570,6412 Texas 261,9143 California 155,9734 Montana 145,5565 New Mexico 121,3656 Arizona 113,6427 Nevada 109,8068 Colorado 103,7309 Wyoming 97,10510 Oregon 96,003
So to use this data, I’ll format it as a CSV file. I can then loop through it programmatically, calling INSERTs to the database on each row/line. I will have to combine all the various bits of data first, though (not just square mileage, but also 2020 population, date admitted to the Union, etc.)
So I remove all the commas (by replacing them with nothing), and save this file as SquareMileage.txt and commence to let my fingers do the googling again.
This time I google “2020 population for each State” and found this [https://worldpopulationreview.com/states].
So I did the same thing with the data I found there. The less-than-optimal thing about this data is it contains a lot of “junk” (“junk” meaning stuff I don’t want):
1 California 39,937,500 0.96% 39,557,000 37,320,900 7.01% 11.94% 2562 Texas 29,472,300 2.68% 28,701,800 25,242,700 16.76% 8.81% 1133 Florida 21,993,000 3.26% 21,299,300 18,845,800 16.70% 6.58% 4104 New York 19,440,500 -0.52% 19,542,200 19,400,100 0.21% 5.81% 4135 Pennsylvania12,820,900 0.11% 12,807,100 12,711,200 0.86% 3.83% 2876 Illinois 12,659,700 -0.64% 12,741,100 12,840,800 -1.41% 3.79% 2287 Ohio 11,747,700 0.50% 11,689,400 11,539,300 1.81% 3.51% 2888 Georgia 10,736,100 2.06% 10,519,500 9,711,810 10.55% 3.21% 1879 N. Carolina 10,611,900 2.20% 10,383,600 9,574,290 10.84% 3.17% 21810 Michigan 10,045,000 0.49% 9,995,920 9,877,540 1.70% 3.00% 178I only want the first three columns (Rank, Name, and 2020 Population). It’s easy, but tedious, to strip the extraneous data from the end. But the whole purpose of computer programming (pretty much) is to kill tedious work dead – let the machine do it!
So we will write a quick utility to strip off all of the “junk” later, before combining the various data points in a CSV file to get ready for populating our states Database Table with.
Next up, we need the Dates Admitted to the Union for each State. By googling “date admitted to the union,” I got this [https://www.britannica.com/topic/list-of-U-S-states-by-date-of-admission-to-the-Union-2130026].
The data I gleaned from there was in this format:
Delaware December 7, 1787Pennsylvania December 12, 1787New Jersey December 18, 1787Georgia January 2, 1788Connecticut January 9, 1788Massachusetts February 6, 1788Maryland April 28, 1788South Carolina May 23, 1788New Hampshire June 21, 1788Virginia June 25, 1788I deleted the “*”s, as I have no use for them. I will have to convert the Dates from the (human-friendly) way that they appear in the list above to the format the Database needs. I saved this data to a text file, also.
So we have what we need that way. The rest of the columns/fields are either going to be “a surprise” (and I’ll grab those pieces of data myself, unfortunately painspakingly) or data that the user can add themselves (namely, the haveResidedThere, haveVisited, and notes columns).
In the next Step, we will write a utility (a “quick-and-dirty” app that only does one thing, and sometimes only one time, and then it has “had its day”) to populate the data into our database. After that, we will query the database to show ... whatever it is that interests us about the data.
... Until then!
Earth-shakingly Important Notice: If you have a basic programming question (suitable to an audience of “Kids”), send it to idiolectable@gmail.com, specifying whether you would like your name and location used if it is printed in a future “Step” of this newsletter. If you are a subscriber to the newsletter, you can also leave a question at the bottom of this Step, in the “Comments” section.If you do not want to give your real name, a nickname is acceptable (the first “Letter to the Editor” of mine that was printed appeared in Rolling Stone magazine, back in the early 1970s, and I signed it “Sylvester” for some reason which I no longer remember). Finally, it’s always interesting to see where people are from, so please provide your City or Town and the State it’s in, too (or Province, or whatever the region where you live is called).To listen to this Step, the audio of it can be found here: