


REAL-WORLD COMPUTER PROGRAMMING FOR KIDS of ALL AGES
STEP 37: Downloading and Installing MySQL and DBWB, and Preparing to Create Our First Table

Now that we know the basics about Databases (what they are, why they are so valuable, and the basics of how to communicate with them using SQL, we are going to create a Database, and then prepare to create the first Table in that Database.
MySQL
In order to play along, the first thing you need to do is install the MySQL Database itself. It is free, from Oracle. Then you will need to download and install a magnificent free tool called “Database Workbench” from Upscene.
But rather than have me tell you all the steps I took to find, download, and install MySQL, I recommend that you google "youtube how to install mysql" and watch one of those videos. For example, this one:
…has a quarter of a million views!
Database Workbench
Now, to download and install Database Workbench, follow these steps:
1) Point your browser at https://www.upscene.com/
Do people still say that (“point your browser at ...”)? I may be showing my age there. I still remember when the Internet really took hold, which was around 1990 (the World Wide Web part of the Internet, I mean – other parts of it had already been around for decades – since the 1960s, anyway).
2) Go to the Downloads menu and select from it “Downlight Trial Versions”
Don’t worry, we are not really downloading a Trial version, but a free limited version. Not so limited that we will run into roadblocks, though. It should be plenty powerful and feature-rich for our needs.
3) Now that you're on the https://www.upscene.com/downloads/ page, scroll down to the Database Workbench section of the page and select the “Free Lite Edition” download link (DBWorkbench5LiteMySQL.exe)
4) Now that you have the installation executable downloaded, 2-click it to install. I am assuming you probably know how to download and install software, but just to be sure, you should see this after you 2-click the installation file:

The installer recommends shutting down all other software and, to be on the safe side, I do that (except for the operating system, which is also software, after all, but needs to be running; and my browser, which should be safe to keep open).
5) Once DBWB installs, go ahead and let it run. You will see this:

Now we want to create a Database, so that we can work with one and put our newfound SQL knowledge to use.
6) Click the blue “Register Server” button on the upper left of that opening screen. You should then see this:

As you can see, you only have one option for Database type with the Lite and free version of DBWB, so click the “Next” button. You should then see the “Server Registration Properties” dialog:

Looks pretty daunting! What is all this stuff? For our purposes it should be fairly simple, because we only want a local (stored on our own computer) database. If we select the “Help” button on the lower left, it will open a Help page.
7) Scroll down to “MySQL” and click that link.
You will see that many of these values need to be supplied.
8) Enter a name in the “Alias” edit box. This is the “Alias” of your Database. In other words, it is what you want to call it. In my case, I entered “IdiolectableMySQL”
9) Leave the “Folder” value at the default “[root]”
10) For “Hostname/IP Address” enter 127.0.0.1
11) “Port” should already be set to 3306; if it is not, set it to that
12) Accept “root” as the Username (provided you retained that username when setting up MySQL)
13) Enter the password which you opted to use when you set up MySQL.
And – Wallaby! (Let the French continue to say “Voila!” but as for me, Give me Wallaby or Give Me ... well, just give me Wallaby; I prefer that).
You will now see that your Database has been created in Database Workbench, MySQL Edition (we will just call it DBWB from now on):

Note how the “Alias” we chose (in my case, IdiolectableMySQL) is the name of the whole shebang, also known as the “Server.”
And there are all kinds of interesting (and/or perhaps a bit intimidating) parts to our new Database, such as a “Backups” repository, and “User Manager” and “Role Manager” beneath the “Security” folder. These are mainly for use in large-scale Databases, so we’ll “leave them be” for now.
What we want to do at this time is create a Table. There are some “sample” tables that are already a part of the Database, namely sakila, sys, and world, but we will let them be, too, for now at least.
14) In the DBWB Enterprise Manager, right-click “Databases” and select “Create New Database...” This dialog will appear:

15) Select the “Next” Button.
You will see this:
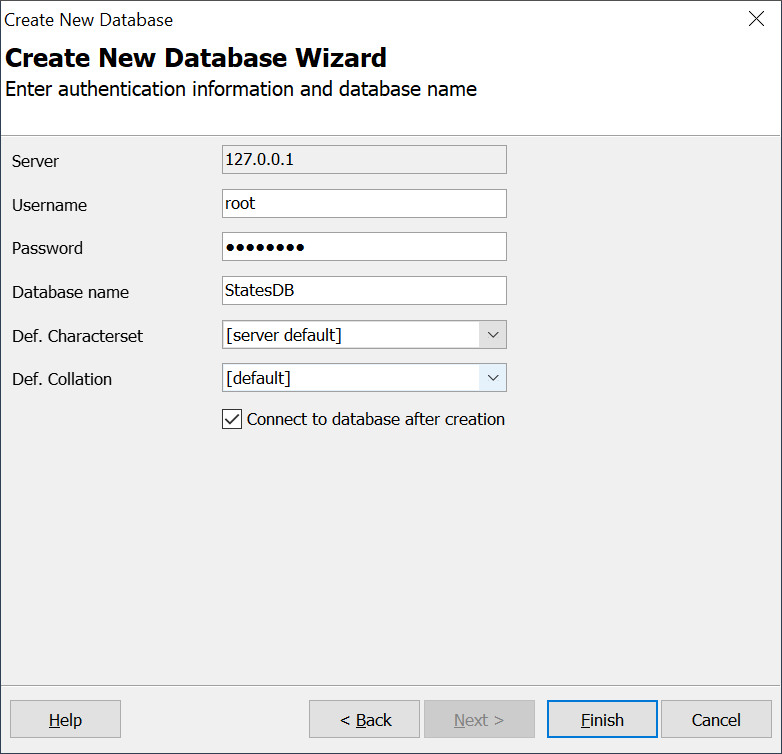
16) Select the “Finish” button.
Your new Database will now display. Right-click “Tables” and select “New Table” as shown here:

This populates the main area of DBWB with a set of Table-related tabs. Select the “DDL” tab, and you will see this bit of template Table Creation code:

You may be wondering what this “DDL” jazz is. DDL stands for “Data Definition Language” and is part of SQL. In fact, the acronym DML (Data Manipulation Language) is also bandied about with regards to SQL statements that “manipulate” (change) data (such as the INSERT, UPDATE, and DELETE statements that we discussed in the previous Step). Again, it’s still SQL to me, as Billy Joel said (or something to that effect).

To create the states table, replace the boilerplate/template CREATE TABLE statement with the specific Table name and column names, along with their data types, that you want. As you will see, though, we will actually be doing that indirectly.
Before proceeding further, though, it is best to march in place for a little while as we discuss data types and how they differ, at least slightly, between different DBMS offerings (such as MS SQL Server, Oracle, Firebird, MySQL, etc.) and even more so between programming languages (such as C#) and Databases in general.
For example, if I were to create a C# class of the table I have in mind, it would be something like this:
class States{ public int ID; public string Name; public int AreaSqMi; public int Population2020; public DateTime DateAdmitted; public int AreaRank; public int PopulationRank; public int DateAdmittedRank; public System.Drawing.Image BookImage; public string BookURL; public bool HaveResidedThere; public bool HaveVisited; public string Notes;}
Of course, this works differently in different programming languages. Even more drastic is the difference when creating a Table in a DBMS. For one thing, the data types, although they have their counterparts (for the most part) have different names and, to some degree, characteristics.
For example, what is called a “string” in C# is a “CHAR” or “VARCHAR” in MySQL. There is no bool data type in MySQL.
The basic template for the DDL required to create a Table is:
CREATE TABLE [ tableName ]( [ column name ] [ data type ], . . . // add as many columns as you want/need);In other words, the basic “shell” to create a Table is pretty simple and sparse. You can add as many columns as you want. You can append a “NOT NULL” to any of the columns, as desired/needed, if you want to make sure that that column always contains a value – the Database will not allow a record to be inserted unless that column has been assigned an appropriate value.
But to now provide a concrete example of creating a Table, I will show you the DDL (Data Definition Language – subset, or dialect, of SQL) that I think will be needed to create a Table that corresponds to the C# States Class above, and then explain it a little.
CREATE TABLE states( states_id INTEGER NOT NULL AUTO_INCREMENT, name VARCHAR(30) NOT NULL, areaSqMi INTEGER NOT NULL, population2020 INTEGER NOT NULL, dateAdmitted DATE NOT NULL, areaRank TINYINT, populationRank TINYINT, dateAdmittedRank TINYINT, bookImage BLOB, bookURL VARCHAR(50), haveResidedThere TINYINT(1), haveVisited TINYINT(1), notes TEXT, CONSTRAINT states_pk PRIMARY KEY (states_id));
As to data types, you probably recognize “date” from C#, and guess that “integer” in MySQL is the same thing as “int” in C#; but instead of string, MySQL uses VARCHAR(N). “VarChar” is short for “variable characters” – IOW, it is a string which contains a variable amount of characters – up to whatever number appears after it. So VARCHAR(30) means the column value can contain any string up to 30 characters in length.
There is also a TEXT data type in MySQL, which stores very large strings. Additionally, you will notice a BLOB type. A BLOB is not a creature from a B-movie which comes sloshing up out of a black lagoon, or some rough beast slouching towards Bethlehem, Pennsylvania. BLOB stands for Binary Large OBject. In other words, a BLOB, from a Database perspective, refers to a very large “bucket” which will hold raw data, rather than holding data of a specific type as the other columns do.
Note: Normally (“the preferred method”) images would not be stored directly in the database, because they can be so large. A more typical approach is to store the images on a local server and then store just the path to those images in the database. But because our database is small (only 50 records), the images will not be huge, and it is more programmatically straightforward to do so, I am storing them directly in the database, in the BLOB column.As the states Table above shows, you can make one of the columns (the first one) an auto-incrementing ID column by declaring it [ column name ] INT NOT NULL AUTO_INCREMENT and you can later declare that ID value as a “pk” (Primary Key) for the Table, which can in turn be used as an FK (Foreign Key) in another table. We’ll get into those matters later when we talk about the “R” that is usually prepended to DBMS – that is to say, RDBMS, which stands for Relational Database Management System.
Note: Time for another pronunciation rant. Many, if not most, programmers pronounce VarChar as if it rhymed with “far par.” But since the “Var” part comes from the word “Variable,” and the “Char” part comes from the word “Character,” it is only logical (and programmers are supposed tod be logical) that it should be pronounced as if it rhymed with “fair care.”We got our Database set up in this Step by downloading and installing the Database (MySQL) and a tool to work with MySQL Databases (Database Workbench), and have prepared to create a Table – the states Table, by determining what its structure, or definition, is to be.
But we have not actually created the Table yet. In DBWB, we will do that “indirectly” by creating one column at a time using the Columns tab. By doing so, the content in the DDL tab will automatically be generated. In the next Step, we will go through the process of building the CREATE statement, and then create the Table using that.
Until then, my friends!
Earth-shakingly Important Notice: If you have a basic programming question (suitable to an audience of “Kids”), send it to idiolectable@gmail.com, specifying whether you would like your name and location used if it is printed in a future “Step” of this newsletter. If you are a subscriber to the newsletter, you can also leave a question at the bottom of this Step, in the “Comments” section.If you do not want to give your real name, a nickname is acceptable (the first “Letter to the Editor” of mine that was printed appeared in Rolling Stone magazine, back in the early 1970s, and I signed it “Sylvester” for some reason which I no longer remember). Finally, it’s always interesting to see where people are from, so please provide your City or Town and the State it’s in, too (or Province, or whatever the region where you live is called).To listen to this Step, the audio of it can be found here: